Saturday, October 31, 2009

Home Is Where the Movies Are

Hi again,

FYI: This is my second post for today, so scroll down for the first one!
Well, I saw a challenge over on The Greeting Farm Blog called "Home is Where the ______ is". Our job was to make a project that answers that question. They have asked us WHERE, WHAT, or WHO reminds you of home.

Here is my story: My dad used to own a machine that held movies for people to rent (with a membership card) called the Video Cube. It was located in the middle of a small neighbourhood so the people in that community could rent videos from the machine. When new movies came in, he would rotate them into the machine, take the old ones out, and bring them home. No exaggeration - we had hundreds of movies in baskets in our basement. Whenever my friends would come over, we would always go down to the basement, and spend 20 minutes down there deciding what to watch. So, I made a movie card!

I used the 2 sets Showtime and Spooktacular from TGF. I thought I would make a spooky card in honour of Halloween.

My card base is Whisper White, then a layer of Basic Black, then a piece of Rockabilly DSP from SU - this particular piece of DSP is glossy...love it.

The horizontal red polka dot piece is from the same DSP pack, and there is a black piece punched with one of the Martha Stewart edge punches (that rickety fence). Across that, there is a piece of black and white self-adhesive tape (miscellaneous from Michael's).

I used a black strip, and punched it on both sides with the Spiral Punch rom SU, so it looks like a film strip. The characters from the Spooktacular set were stamped on white CS with Memento ink, coloured with Copic markers, and punched out with a 1 1/4" square punch.

I stamped the usher girl and the popcorn from the Showtime set on PTI white CS in Versafine black ink, and embossed with Clear EP. I coloured them with Copic markers, cut them out, and mounted them with Dimensionals.

The sentiment is from the Showtime set, stamped with black ink on white CS, and punched out with the Modern Label punch from SU. I sponged some black ink around the edges, and put some red rhinstones from Close To My Heart on both sides. That was also mounted on Dimensionals.

Well, thanks for stopping by! Happy Hallowe'en!

My (Medieval) Prince

Hi All,

Well, I've been looking at my adorable Whiff of Joy stamps, and decided this week, I would get to colouring. I buy mine online at 7 Kids College Fund, and this is their Medieval collection. I used Knight Charlie, and Charlotte's Horse.

I wanted to do a square card, because the horse image is quite large, and I wanted a bit more space.

My card base is Bravo Burgundy, with a layer of white, and a layer of Basic Gray DSP from a retired Hostess pack from SU.

Next, there is a 4" square piece of Bravo Burgundy run through my Big Shot with my Diamonds CB folder, and I swiped White Craft ink over the raised parts, and around the edges to make it stand out a bit more.

At the bottom, I stamped "My Prince" in Versamark, and embossed in white EP. I created a line of Pewter brads using my Mat Pack and SU's Vintage Brads. I like that Pewter colour - really adds to the Medieval feel.

The horse was stamped on a PTI white panel in Memento Tuxedo Black ink, and coloured with Copic markers. I tried to use colours that weren't too flashy.


Next, I stamped the knight on PTI white CS and coloured with Copics, and cut out. I stuck him on beside the horse with snail adhesive on one side, and a couple Dimensionals on the other side for depth.
I really had fun doing this one - I love these images!
Hope you enjoyed, and thanks for stopping by!

Thursday, October 29, 2009

New releases like crazy!

I don't have a project today, but as I have been blog hopping a lot lately, I am seeing a lot of companies that have just released new stamps, or are about to. So, I thought I would share, because I am definitely keeping my eye out for new goodies!

*Verve Stamps: New releases were put out on October 23rd HERE.

*Gina K. is releasing tonight (October 29): Check her store HERE.

*Stamping Bella: New stamps being released on October 30: The store is HERE.

*Kraftin' Kimmie's Corner: New releases set to come out on November 1. The store is HERE.

*The Greeting Farm: New releases set to come out on November 1. The store is HERE.

That's all I've heard for now. The Verve sets are amazing, and I am very excited to see each and every one of the others. Hopefully you can all check them out in the next few days as well. Have fun!

P.S. Links to these stores are also on my sidebar under the title: Where I Shop Online (Besides SU).

Saturday, October 24, 2009

Bellas Twisted Challenge 10

Hi All,

I decided to make a card for the Stamping Bella challenge found HERE. The challenge is to make a project using purple, and the twist is to use some paper piecing. If you have neve done paper piecing, it is very simple, and you can see my tutorial HERE.

Here is my card:

First of all, let me apologize - I don't know why I took this picture on a slant like that.

My card base is Whisper White, then a layer of Basic Black, then a layer of retired SU Slumber Party DSP. I added some piercing in the top right corner of that with one of my Ornare templates. I also tied some Eggplant ribbon along the bottom.

The main panel is all punched out using Long Rectangle Nestabilities - white and black panels. The image was stamped on the white panel with Memento Tuxedo ink, and coloured with Copic markers.
Her name is imeldabella
She is a girl after my own heart! The paper piecing shows up here - I stamped all of the shopping boxes onto the DSP, cut them out, and layered them on. Notice how pretty her stack of shopping is!

The sentiment is also from Stamping Bella - they have some great sentiments, and they are sold individually, so you can pick and choose the ones you want! Mine says "have a magical day", and it is stamped on white CS and punched out with SU's Modern Label punch, and the black layer is punched out with one of the Lots of Tags Sizzlets and my Big Shot.
Hope you enjoyed, and thanks for stopping by!

Friday, October 23, 2009

Birthday Anya Challenge Card

Hi All,
I have a great birthday card to show you - it was created for the challenge on the Greeting Farm blog last friday at THIS post. It was a No Frills challenge, which means that you weren't able to use frilly things like ribbon, flowers, lace, etc.
If you would like to check out THIS post, you will see that they chose me as the winner this week! Woo hoo! I don't know what I will get, but once I get it I will post the update! At the same post, they have announced this week's challenge, which is to use punches.

Here is my card:
I decided to make a larger square card for this one, so the card base is Whisper White and makes a 5 1/4" square card. The next layer is Pumpkin Pie (5 1/8" square), and the next layer is a really cute flocked paper from Heidi Grace (5" square).


For the horizontal layer, the Pumpkin Pie layer is punched with the Martha Stewart fence edge punch, then topped with a layer of So Saffron and Whisper White.


The sentiment is from the SU set Sincere Salutations, stamped in Close to Cocoa ink, and punched out with the Key Tag punch. There is So Saffron ink around the edges to frame it, and it is mounted on Dimensionals. Here is where I would have added the ribbon - it hurts.

The image is, of course, from The Greeting Farm, and her name is Birthday Anya. She is just THE CUTEST. She was stamped in Versafine Black ink onto white CS, embossed with clear EP, and coloured with Copic markers. I cut her out, and mounted her on with Dimensionals. The ovals are cut out with Nestabilities in white, So Saffron, and Pumpkin Pie.

Lastly, the button are from the Button Latte pack from SU. I tied Linen Thread in the centre of each and adhered them with Mini Glue Dots to the bottom left corner.

Hope you enjoyed, and thanks for stopping by!

Verve Challenge Card #5 (and final)

Woo hoo!

It is release day over at Verve! The release party starts tonight at 9pm over in the Verve forum (this is an electronic party, by the way), and then after the party ends, you can hop over to the Verve shop and start buying the new releases!
Once again, to see the 5 sketch challenges Julee made for this week, click HERE, or I have posted the sketch for today below.

Here is my card:


I gave some more love to my Verve stamps on this one. I used the stamp set Ornamental Christmas. This has all the best sentiments for the holidays, and if you so desire, they fit inside all the ornaments!

My card base is Soft Suede, then a layer of Brushed Gold, then a layer of the new Christmas Cocoa DSP from SU. For the horizontal panel, it is a piece of Soft Suede CS punched with the Martha Stewart fence edge punch, and then another layer of the DSP (the piece with the holly on it). Below that, I tied a piece of Soft Suede Polka Dot ribbon.

For the main panel, I cut out a square of white, then a larger square of gold, the a larger square of Soft Suede. On the white piece, I stamped the ornament in Memento Brown ink, and sponged the edges of the square with Soft Suede ink. The branches were stamped at the top in Always Artichoke ink.

I stamped another ornament on a piece of scrap paper, cut out the ball, stamped the sentiment in Versamark, and embossed with Gold EP. Then, I sponged the outside with Gold Encore ink and Soft Suede ink, and mounted it with Dimensionals.

Hope you enjoyed and thanks for stopping by!


P.S. See you at the release party tonight! My SCS name is r2mckinl.

Thursday, October 22, 2009

Verve Challenge Card #4

Hi All,


Check out the Verve forum on SCS or click HERE to see the sketch challenges for this week's release. Here is the 4th sketch:

Here is my card:


My card base is Whisper White, followed by a 5 3/8" x 4 1/8" piece of Brushed Silver CS. For the top layers, I used a piece of Whisper White, and a piece of Bermuda Bay, and punched them with the Double Scallop edge punch from EK Success. I love the new punches they have put out! In the top right corner of the Bermuda piece, I added some snowflake rub-ons from SU.

The horizontal strip is Brushed Silver, and I cut the "V" out of the right side with a pair of scissors (I tried to keep it as even as possible).

For the image panel, I used my square Nestabilities, and I sponged the white piece with Bermuda Bay ink. I punched the left side with SU's Horizontal Slot punch, and weaved some Bermuda Bay Polka Dot ribbon through it, and tied it with Linen Thread.

This image is from the Flourishes set All Wrapped Up. It is stamped in Memento Tuxedo ink on Neenah Solar White CS, and coloured with my Copic markers. I used a white gel pen for some highlights on the top parts of the bow. The string of pearls is a self-adhesive pack I bought at Michael's. The sentiment is from the same set, stamped in Brilliant Blue ink and cut out.

Hope you enjoyed, and thanks for stopping by!

Wednesday, October 21, 2009

Verve Challenge Card #3

Hi All,

As promised, here is my card for Julee's third sketch - check out the Verve Release Week Challenges post for all her original sketches. Here is the sketch for this one:

For my card, I decided to pay some special attention to my Verve stamps. I used the lovely Because of You set for the main flower image.

I stamped the flower image twice in Melon Mambo ink on Melon Mambo CS, and let it dry completely. Then, I swiped my Embossing Buddy across it to get rid of any static or moisture. I stamped the same image in Versamark ink in the centre, and embossed with white EP (embossing powder). That layer was mounted on to a white layer.

For the card base and the other layer, I used white CS and Barely Banana CS. The banana layers were embossed with SU's Finial Press embossing folder, and I swiped Melon Mambo ink across the raised parts so that the colour faded from darker at the bottom to lighter at the top.

I used the Eyelet Border punch on the white layer, and the sentiment is punched out with the Key Tag Punch...also stamped in Melon Mambo ink. That sentiment is from the Verve set called Beautiful You.

The ribbon I used is an old SU organdy ribbon - it is very sheer, so difficult to see in the picture.

Hope you enjoyed, and thanks for stopping by!

Tuesday, October 20, 2009

Verve Challenge Card #2

So, here is the next card for the Verve Release Week Challenges. I decided to give my SU stamps a bit of love this time. And maybe a bit of Stamping Bella for good measure. The sketches can be found over in the Verve forum on SCS HERE. Or I have included a look at the sketch here:


When I saw that little panel on the right side, I knew most people would want to put their sentiment there - it is just calling out for a sentiment. BUT...I wanted to do something different, so I decided to put my image there, just to be bad : )

I decided to keep this one VERY clean and simple.

The card base is Kraft CS, with a 5 3/8" x 4 1/8" layer of Basic Black CS, then a 5 1/4" x 4" layer of Urban Oasis DSP. I absolutely LOVE these colours together!

The next layer is Urban Oasis DSP and Basic Black CS, but "tipped" until the corners of the smaller panel are touching the sides of the card base.
I think the main panel is 3" x 2", just white, and a black piece 1/8" larger. I stamped one of the flowers from 5th Avenue Floral onto Kraft CS in Basic Black ink twice. On one of the flowers, I coloured the middle with my White Gel Pen. I cut one of the flowers out completely, and I cut pieces out of the other flower to layer. Both were covered with Crystal Effects to buff up the shine.
The sentiment is from Stamping Bella, and it is my fall back sentiment - it works for EVERY card (except sympathy, of course).
I like the simplicity of this card - it is opposite to some of the cards I will be showing this week for the other challenges.
Hope you enjoyed, and thanks for stopping by!

Monday, October 19, 2009

Verve Challenge Card #1

*Note: this is my second post for the day, so scroll down to find the first*

It has been a few months since I participated in the Challenges for a Verve release, so I thought I would jump in this month. There are 5 sketch challenges, and they can be found HERE. The idea is to make a card with each layout, post them on SplitCoast, then post all of the links to each card on the main We Are The Champion Thread.
Here is what the sketch looks like:
Here is my card:

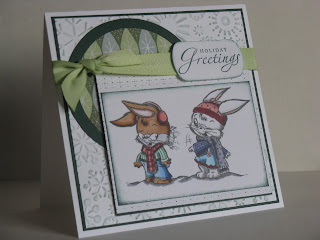
My card base is a 5 1/4" square piece of Whisper White CS. The next layer is a 5" square piece of Handsome Hunter CS, followed by a 4 7/8" square Whisper White piece. That white piece was run through my Big Shot in my Snowflakes Cuttlebug embossing folder. Afterwards, I took a sponge with my Sage Shadow ink and brushed it over the raised parts to highlight the snowflakes a bit more.

I used my Coluzzle with Handsome Hunter CS and Wintergreen DSP to make the 2 circles.

The image is from The Greeting Farm. It is called Snowball Fight, and it is a digital image. I printed it out onto Papertrey white CS, and coloured it with my Copic markers.

The ribbon is Certainly Celery Poly Twill ribbon from SU, and the sentiment is from the SU set Sincere Salutations - stamped in Handsome Hunter ink and cut out with the Tag Punch.

The image panel and the sentiment panel both have Handsome Hunter ink around the edges to frame them - beacuse there is so much white on the card.


Hope you enjoyed, and thanks for stopping by!

Big Red Present

Hi All,

I had an itch to do a card with one of my Flourishes sets, so I chose All Wrapped Up. This is the best "present set" I have ever seen! Everything is so elegant, and colouring is so fun!

I decided on the colours for this based on my selected DSP - Christmas Cocoa. I just had to use the paper that is flocked....mmmm, flocking. Also, I wanted to do a long card to fit in the open-ended envelopes from SU.
My card base is a 6 1/2" square piece of Whisper White CS (finished card size was 6 1/2" x 3 1/4"). Next, there is a layer of Soft Suede CS (I think 1/8" smaller), then a layer of that lovely flocked DSP at 6 1/4" x 3".
On top of that, I cut out one 1" x 12" strip from the striped paper, and cut that into 2 pieces and stuck them on. Then, I used my Crop-A-Dile and my Jumbo Eyelets from SU at the far right side.


For the main panel, I stamped the large present onto Neena Solar White CS with Memento Brown ink, coloured it in, and cut it out.

I coloured that image in with the following Copic markers: R20, R24, R29, E71, E74, W1, W5, W7, and 0 (Colourless Blender). I also used my white gel pen for some highlights.

For the panel, I cut out a piece of Whisper White CS with one of my Label Nestabilities sets, and sponged inside the frame with Soft Suede ink. I mounted the present onto that die cut with Dimensionals, and mounted the whole thing to the card with Dimensionals.

Lastly, for the sentiment: it is from the same stamp set. I just stamped it in Soft Suede ink onto white CS, and trimmed it with my paper snips.

I wish you could feel this card - it's so fluffy! Hope you enjoyed, and thanks for stopping by!

Oh yeah, and I stamped some presents on the envelope to match.

Sunday, October 18, 2009

Lovely Christmas Card

Check out this gorgeous ornament card! Just thought I would post this great find!

blog it

Saturday, October 17, 2009

Mercy's Tuesday Sketch Challenge and CC240

Hi All,


Well, this week I had been working really hard on getting a lot of baby invitations done for a girl at work, so I really had a craving just to do something else - anything else! So, I wanted to participate in some challenges.

Firstly, I decided to do the Splitcoast Colour Challenge CC240: Bermuda Bay, Chocolate Chip, and Apricot Appeal. I really like this one!!!

Secondly, I decided to participate, for the first time, in Mercy's sketch challenge that she puts out every Tuesday. This is the 43rd one (MTSC43, the one from this week), and you can find her post HERE.

So, let's get started. I definitely used a lot of the Bermuda Bay colour, which made this a bright one!


My card base is Chocolate Chip, just a standard A2 size. I layered a 5 3/8" x 4 1/8" piece of Bermuda Bay CS on top of that, and it was run through my Big Shot with my Houndstooth Cuttlebug embossing folder.

Next, I took a random strip of Whisper White CS (scrap pile), and cut it to a length of 4 1/8", then punched the edge with my Eyelet Border punch from SU, and wrapped a piece of Bermuda Bay Polka Dot ribbon around it, and adhered it to the base with Dimensionals. (woah, run-on sentence?)
My stamp set is from Verve, and it is called Wishful Elegance - Way to go Julee on that one!

For the back 2 panels, I used 2" squares of

Chocolate Chip CS for the mats, and the Apricot Appeal pieces are 1 7/8" square. Those pieces are stamped with the large background stamp from that set in Apricot Appeal ink.

For the main panel, it is a 3" x 2 3/4" piece of Whipser White CS. I first stamped the sentiment from that set in Bermuda Bay ink in the bottom right corner. Then, I stamped the larger, full flowers in Memento Tuxedo Black ink, and coloured them with a yellow Copic marker.


Next, I took a scrap piece of white and stamped the larger, partial flower 3 times, and coloured those in with brown, aqua and yellow Copics. Then, I cut them out and mounted them onto Dimensionals for some pop.

I hope you enjoyed, and thanks for stopping by!

P.S. Is it cheating if you use white in a colour challenge, even though white is not part of the list?

Tuesday, October 6, 2009

Wonderful Words, Set of 4

Hi All,

I decided I really wanted to use some of my self-adhesive Martha Stewart flowers that I got at Michaels. Hmmmmm.
So, I decided to do a set of 4 very simple cards. I only used a card base of Very Vanilla, and I created the frames using my square Nestabilities in my Big Shot.


For the Big Shot sandwich (from bottom to top), I used the Multi-purpose platform (on Tab 1), then my cutting plate, then my nestie (facing up), my card base, 3 pieces of scrap CS (A4 size), my silicone rubber mat, then my 2nd cutting plate. This is how I emboss with my Nesties without cutting.

I used the Wonderful words stamp set for all 4 cards - a different word for each card. I also used the Martha Stewart butterfly punch with a different colour CS for each card.


This card used Close to Cocoa ink and cardstock.


The next card uses Chocolate Chip ink and So Safron cardstock.


The next card uses Cameo Coral ink and cardstock.


The final card uses More Mustard ink and cardstock.


Hope you enjoy and thanks for stopping by!