Monday, March 30, 2009

Quilt Card

Hi All!


So, there is a birthday coming up this week, where I thought a quilt card would be very appropriate. I also wanted that to be the main focus of the card, so I didn't add much else to it.


The card base is Baja Breeze, then layered with Basi Black and white CS. I used my Ticket Corner Punch on those 2 layers. Then the double stitched Baja Breeze ribbon was wrapped around that layer.

I cut out a Top Note die with my Big Shot, then layered it with lots of 1 1/4" squares from the Hand Made DSP pack (hostess level 3 set).

I used the criss-cross stamp from the set All In A Row to make it look like stitching. My Stamp-A-Ma-Jig came in VERY handy for that one! Then, I sponged the edges with Baja Breeze ink.

I used the big flower from Eastern Blooms - first inked it up in Baja Breeze, then rolled the edges in Ridinghood Red, then stamped it and cut it out. I added some Dazzling Diamonds Glitter to the centre with my 2-Way Glue Pen.

I stamped a sentiment from Crazy For Cupcakes onto white CS, then punched it out with the Word Window Punch.

Hope you like it and thanks for stopping by!

Sunday, March 29, 2009

Robin's Web Finds, Week of March 29, 2009

OK, get geared up for the amazing finds for this week.


1. Jeanne Streiff (Inky Paws): No Worries Card


2. Beate John (fresh & fun): Fabulous Friend Card


3. Claudia (Pretty Pressings): Tilda with Lamb Card


4. Dawn (Dawns Stamping Thoughts): Sesame Street Card with Punches and Kindness Card


5. Kathie Bailey (Just an Inking): Pleated Card


6. Suzanne (Scrap Bitz): Miss Anya Card


7. Renee (Stamping for Sanity): Friend Butterfly Card and And Many Mower Card


8. Silke Ledlow (My Life): Little Things Card

9. Faith (Stampin' With Markie's Mom): Seahorse Card


10. Jodi Collins (Stamping A Late): Kiwi Kiss Card


11. Jessica Rone (Can You Say Addicted to Stamps): Food Replaced Sex Card


12. Kim Teasdale (Paper in the Works): Chicken Soup Card


13. Nancy Riley (iStamp): Grad Card


14. Amy Rohl (Ink About Me): Ridinghood Red Anya Card


15. Jody Morrow (Confessions of a Ribbon Addict): 5th Avenue Floral Card and Kind People Card


16. Julee Tilman (Poetic Artistry): Card for a Cause


17. Michelle (Freedom in Creating): Blended Bird Card


18. Chat (Me, My Stamps, and I): Soft Summer Card


19. Nancy Morgan (Paper Smiles): 5th Avenue Floral Prayer Card


Thanks for stopping by!

Pink & Purple Presents!

Hi All!

Well, I got a delivery yesterday fom Flourishes! I decided to play on Saturday afternoon with the set called All Wrapped Up. Love this present image!


I made a 5 1/4" square card this time - I have no idea why.
The main panels are cut using white and Pale Plum CS, and my long rectangle Nestabilities. I stamped the image with Memento ink, and coloured with my Copics. I stamped the imge again onto a scrap, coloured it in, and cut out the ribbon & bow. That was mounted with foam squares to give it a raised look. I also highlighted a couple of spots on the bow with a white gel pen.

The next layer was cut using the Scallop Circle die from SU/Sizzix with the Big Shot in Regal Rose CS. I sponged the edges with Regal Rose ink. Then, I took the flourishes from the SU set Doodle This, stamped them inVersamark, and embossed them in white EP. I used up some of my Organdy ribbon (retired).


The final layer is a 5" square piece of Glossy White CS, which I brayered with Regal Rose and Rose Red inks at the bottom. Just to add some extra interest!
Hope you like it - thanks for stopping by!

Saturday, March 28, 2009

Kristina Werners Colour Inspiration Challenge #47

Hi All,

Phew! I'm so glad it's the weekend. I haven't done a CI Challenge from KWerner in a really long time. Well, when I popped over there to see what the latest combo was, I gasped! It was right up my alley, so I couldn't help but participate. Get this: it's Chocolate Chip, Tangerine Tango, So Saffron, and Whisper White. I LOVE IT!

So, here is my take on it. I tried to go for simple.


I used plain white as the base. I tied the So Saffron ribbon around it (the one you receive from the Sale-A-Bration Catalogue), and I tied a small piece of Linen Thread around that, too.

For the top right square, I used my 1 3/8" square punch, and punched out a piece from the Delicate Dots DSP pack (also from Sale-A-Bration). I stamped a flower on it from the A Flower For All Seasons stamp set. I coloured it in with regular SU markers, and I stamped it again on a piece of scrap, so I could cut parts of it out and mount them on Dimensionals (just the pot and the flowers).
For the other 3 squares, I used my 1 1/4" square punch with Tangerine Tango Prints DSP, Hawaii Papaya DSP, and Bella Rose DSP to get the different patterns. I used my Scallop Square punch for the layers for those 3 squares.
The buttons are from the Buton Latte pack - they just so happen to be the EXACT colours in the Colour Challenge! I mounted them all with Mini Glue Dots, and Linen Thread is tied around the brown one.
I think that's about it - I hope the pictures are OK; it was a pretty nice day this morning.
Thanks for stopping by!

Tuesday, March 24, 2009

Guess what's been happening?

Hi All,


Well, I am so excited to tell you about a couple of things.

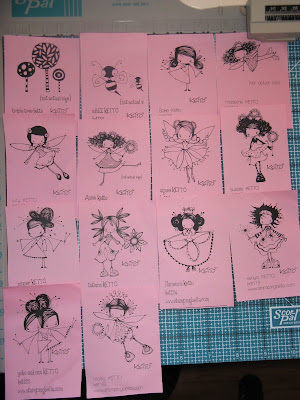
First of all, Stamping Bella just had a new line of stamps released called KETTOs (if you have been on any online stamping forums lately, then you already know about them). I had placed an order almost 2 weeks ago, and I FINALLY GOT THEM! I have already mounted them, stamped some off, and am preparing to colour them, but I thought I would at least show you which images I got. They are very whimsical and cute! They all have different names, and different looks, but are all tied together witht the same style!


Secondly, I am officially a Certified Copic Designer! I took the full day class today in Toronto (actually Brampton), and it was great! Marianne Walker (by the way, she has a very popular blog called I Like Markers) showed us several different things. First, she talked about the types of paper and ink we should be using. Then, she talked about all the different types of markers Copic makes. She showed us several techniques of colouring and blending, and she showed us how to use our Colorless Blender for blending and for special effects. At the end, we got to use the airbrushing system (uh oh, I'm in trouble - it's definitely on the list).

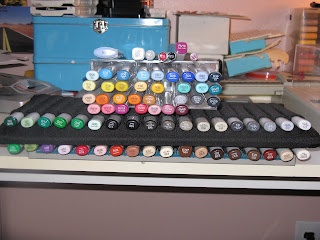
Below is a shot of my collection to this point. This is including the markers I already had, and the few that we received with our class today (We received 2 Sketch markers, 2 original Copic markers, 1 Various Ink Refill, 2 multiliners, a Ciao Colorless Blender, a Copic Wide marker, and an Atyou Spica glitter pen).


I took a picture of one of my scrap sheets to show you the kinds of things we were doing.

I brought pre-stamped images from the Greeting Farm, so that I could work with them while I was there.
On the the top Anya (with the orange hat), I practiced blending colours within the same family, and only a few numbers apart. You can see that the bottom left corner of the hat is much darker, then fades into the lighter colour.

On the Mermaid Anya, I practiced blending 2 completely different colours together (yellow and purple hair). This technique takes a lot of practice, and I'm sure I will be trying to perfect it in colouring sessions to come.
Lastly, on the Cheerleader Anya at the bottom, I practiced fading from a dark colour to a light colour. We use the light-coloured marker as the "paint brush", and scoop up a darker coloured ink with it. I did that with her pom-poms, her bows, and the letter "A".
Let me know if you have questions, and I'd be happy to answer to the best of my ability. I hope to be adding the "Copic Certified" logo to the side of my blog soon.
Thanks for stopping by!

Sunday, March 22, 2009

Robin's Web Finds, Week of March 22, 2009

OK, here are the finds for this week...enjoy!


1. Amy Rohl (Ink About Me): Combo Challenge Card

2. Suzy (papermonkey.org): Magnolia Elf Card

3. Jodi Collins (Stamping A Latte): 5th Avenue Floral Card

4. Carol (Stamp Like Crazy): Giraffe Baby Cards and Praying For You Card

5. Faith (Stampin' With Markie's Mom): Geisha Card and Beate CASE Card

6. Kimmie (Kraftin' Kimmie's Korner): Ivy KETTO Card

7. Renee (Stamping For Sanity): Thanks So Much Card

8. Silke Ledlow (My Life): May God Bless You Card

9. Connie Collins (Constantly Stamping): Easter Basket

10. Michelle (Zindorf): Swirly Butterfly Card with Tutorial

11. Kim (Paper in the Works): Butterfly Sympathy Card

12. Amy (Amy`s Addiction): Manhattan Embossed Card


Hope you enjoyed!

Magnolia Blog Candy

Head on over to Claudia's blog. She has some fantastic cards, and she is giving away some blog candy! She is showcasing come really cute sets from Magnolia, so go check it out! Below is a picture of what she will be drawing for:


Verve Easter Challenge - Special Project

Hi All,

There is a project parade over on the Verve blog where you can win stamps if you submit an special Easter project. Well, I wish I could have used Verve stamps for this, but I am still waiting to receive my order from the new release. I made a card and a matching Easter pouch for goodies.


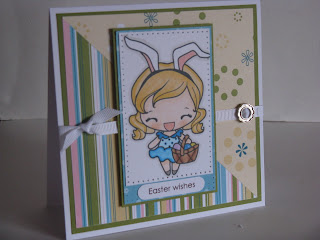
I chose another Anya stamp from The Greeting Farm. This one is called Easter Anya, and she is a digital image (that means she is not a physical stamp - you purchase the file, and then you can print her off and colour her in!). She makes a pretty cute bunny, if you ask me.

As usual, I coloured her with my Copic sketch markers.

The card base is a 5 1/4" square of PTI white CS. The next layer is a 5" square piece of Old Olive. Then, I took a 4 3/4" square piece of DSP from the retired Petals & Paisleys pack from SU, and cut the square on a diagonal, so I could have 2 different patterns showing.

Anya's white panel is 2 1/4" x 3 1/2". That was then mounted onto a 2 3/8" x 4" piece from that DSP pack again. Lastly, that was mounted onto a 2 1/2" x 4 1/8" piece of Old Olive CS. I paper pierced the white and blue layers with my paper piercer and Mat Pack.

The sentiment is a rub-on from from the Chit Chat pack from SU. That was punched out with the Word Window Punch. The ribbon is regular white grosgrain, with one of the ribbon sliders from SU.

For the pouch, I used a 12" x 12" piece of the Petals & Paisleys DSP , and used the Diaper Fold technique. I used the flower from the Verve set Beautiful You, and coloured it with my Copics. I used an alphabet from Close To My Heart to stamp the sentiment. I stuffed a packet of hot chocolate in there for good measure.


Hope you like it, and thanks for stopping by!

Saturday, March 21, 2009

SC220 - Rock the Farm

Hi All,


I saw the sketch Challenge this week over on SCS, and absolutely HAD to try it! I think I will use this one again in the future! I find that all the panels allow you to showcase some really lovely designer papers - and you don't need very big pieces, in case you are trying ot get rid of scraps!


Well, I am on a Greeting Farm kick lately. I used the adorable set called Rock the Farm. It is another one of those "Anya & Ian" sets, but I only took Anya this time. I also used a couple of the animals from McSplendid Farm.


I stamped her in Black Soot Ranger Distress ink onto Very Vanilla CS, coloured her with Copics, and cut her out. Same goes for the chicken. The cow was stamped onto the main rectangle panel and coloured with Copics.

I sponged Old Olive and Bashful Blue ink around the cow to fake a scene. That was mounted onto a Pumpkin Pie panel, then onto a Chocolate Chip panel. At the bottom, I punched the CS with a Martha Stewart edge punch.

The card base is So Saffron, then comes a layer of Chocolate Chip. The panels are made from my Hawaii Papaya DSP, then the So Saffron ribbon from the SAB catty is next.

I really wasn't sure what sort of sentiment to add to this one - I guess we'll see what I use it for!

Thanks for stopping by!

Friday, March 20, 2009

Lovely Card Made by Beate

Hi All,


I spotted this AMAZING card on Beate's blog. There is a snippet below. You will have to click on the photo to jump over to her blog and view the whole card and how she made it. It showcases a new stamp set and new DSP from the upcoming Occasions Mini Catalogue.

Thanks Beate!

Wednesday, March 18, 2009

Distress Ink Card with Michelle Zindorf

Hi All,


There is a glimpse of a card made by Michelle Zindorf below. She is really great with a brayer, but for this card, she used her Ranger Distress inks in many different colours. She gives a step-by-step instruction on how she made this card. Click on the picture to go to her post!

Enjoy!

Tuesday, March 17, 2009

Wedding or Anniversary Couple

Hi All,

I really wanted to ink up this set I got from The Greeting Farm called Cake Topper. It is a really cute set for weddings/anniversaries.


Firstly, I used a standard sized white card base, and embossed it with the diamonds Cuttlebug folder with my Big Shot. It is hard to see in this pic, but you can always click on the photo to enlarge it.

Then, I used Basic Black CS, Basic Gray CS, and Basic Gray Prints DSP with my Classic and Scallop Oval Nestabilities (with the Big Shot).

I stamped the images in Black Versafine and embossed them with clear EP. I then coloured them with Copic markers. I cut them out, and mounted them on foam squares.

The sentiment was stamped on white CS and punched out with my Small Oval Punch, and I put a tiny bit of Pacific Point in on the outside just to frame it.

The ribbon is the Gray Taffeta from SU.

Hope you like it, and thanks for stopping by!

Monday, March 16, 2009

Brayering Videos - How To

Hi All,

Ever feel like you couldn't use a brayer to save your life? Well, our good friend Renee at Stamping for Sanity has linked a couple of videos made by Mrs. Lumpy, and she has also made a beautiful card! To learn doing scenery/a backgroud is a MUST!
(Click on the picture to go to her post)


Sunday, March 15, 2009

Robin's Web Finds, Week of March 15, 2009

Here are my finds for this week:

1. Nancy Riley (iStamp): Praying for You Card

2. Beate (fresh & fun): Duck Card and Cute Little Bunny Card

3. Jeanne Streiff (Inky Paws): Mad Cow Card

4. Dawn (Dawns Stamping Thoughts): Honey Gate Fold Card and Faux Ripped Paper Card

5. Cindy Lawrence (The Creative Closet): Friends are Like Flowers

6. Danielle Lounds (Fat Cat Stamper): Mermaid Box Tutorial

7. Jodi Collins (Stamping A Latte): You're So Thoughtful Fruit Card

8. Kelly Lunceford (Flutter By atomic butterfly): Tied the Knot Card

9. Connie (Constantly Stamping): Cherry Pillow Box

10. Carol (Stamp Like Crazy): Bleached Thoughts & Prayers Card

11. Chat (Me, My Stamps, and I): Acetate Card and Purses Card

12. Julee Tilman (Poetic Artistry): Black & White Butterfly Card and Floral Symphony Card

13. Amy (Amy's Addiction): 5th Avenue Card

14. Amy Celona (ustampforfun.com): Mirror Image Card & Technique

15. Kirsten (Kirsten's Stampin Korner): How to Make a Ribbon Rose

16. Gayle Mather (Little AM Creativity): Lovey Dovey Card

17. Kirsty Brown (Kirsty;s Card N Scrapping): Whale Wishes Card


Wow, it was a rough week...SO many fantastic people crafting out there! Enjoy!

Perpetual Calendar Template

OK, so as promised, I am revealing where I got the set up for the Perpetual Birthday Calendar. I got the template for my calendar from Danielle Lounds' blog. She made it herself, and decided she would share it with everyone! A big thank you to her. Here is the link if you want to download a copy for yourself:

http://www.4shared.com/file/87592010/a977ad46/PerpetualCalendar_DanielleLounds.html

Have fun making calendars!

Saturday, March 14, 2009

Upsy Daisy Birthday Card

Hi All,


Well, after spending a LOT of time preparing the birthday calendar (previous post), I decided to add a card to my workshop schedule for this weekend. My colour combo choice is often based on a particular Designer Series Paper that I want to use. This time was no exception.

I based my colours on the brand new Sweet Slumber Specialty DSP. I LOVE this paper. It is a little more expensive than the regular DSP, but once you get it, you know why. Firstly, the paper is extremely thick - a lot heavier than the regular DSP - actually, more like cardstock. Secondly, it is all textured, which adds another interesting element to your cards!


My card base was an 11" x 4 1/4" piece of white CS folded in half. Then, I used a 5 1/4" x 4" piece of Baja Breeze CS, and ran it through my Big Shot with th diamonds Texture Plate.

Next, I cut a 5" x 3 3/4" piece of Sweet Slumber DSP, then chopped in half diagonally (so, I would get 2 triangles out of it).

For the main panel, I used a 2 1/2" square piece of white CS, and stamped it with the flowers from Upsy Daisy (love those silhouette stamps!) in So Saffron ink (outsides were rolled in Baja Breze ink before stamping).


That was then layered on a 2 3/4" square piece of Baja Breeze CS, then layered again onto a 2 7/8" square piece of Ridinghood Red CS, which was punched with the Ticket Corner Punch.

Hope you like it, and thanks for stopping by!


Thursday, March 12, 2009

Perpetual Birthday Calendar

OK, so I have seen several different versions of this type of project. Please keep in mind...these picturees are not very good quality, as they were taken with no natural light. You get the idea. I will be putting up the link to the template I borrowed in a later post - it was made by Danielle Lounds.


It takes 6 pieces of neutral CS (white or vanilla), as 2 months print on each piece. I then backed each calendar month with a 10 1/2" x 3 3/4" piece of Kraft CS. The front and back covers are 10 1/2" x 4" pieces of Basic Black CS. I used my Bind-It-All for the coil binding.


I decorated the cover with the DSP and ribbons you can earn during Sell-A-Bration with Stampin' Up! For Canadians, you only have to place a $60 order to receive one of the offers in the SAB brochure for free! Or you can earn them by hosting a workshop until the end of March (then we welcome the Occasions mini!). OK, back on track...

For the cover, I used the Big Deal Alphabet in Certainly Celery ink to spell the word Birthdays. Then, I used some of the fine cosmo glitter in green and my 2-Way Glue Pen to highlight some of the letters.


For January, I used some retired Ski Slope DSP, and some Felt Flurries (both from the Winter mini), and I used the stamp set Snow Burst.


For February, I used the stamp set Priceless, as well as my 2-Way Glue Pen and Dazzling Diamonds Glitter.


For March, I used the Shamrock from the set All Year Cheer (I think...). It's retired now, but that's all I could think of for March. I stamped it in Glorious Green ink, and I used my 3/4" Circle punch with Black CS at the bottom.


For April, I used another piece of DSP from the SAB catty at the top. At the bottom, I used the adorable designer Filigree brad.

The stamp set is A Flower for All Seasons. Firstly, I stamped it in black ink. Then, I took the negative rubber (you know, the rubber that is left over after you have punched out the die-cut stamps? Well, I keep that), and I placed it over the image, and I stippled over the entire image with Creamy Caramel ink. That is what makes that brown cloud around the outside of the image. Then, I coloured the image in with markers.


For May, I used the set Crazy for Cupcakes (LOVE that set, and you will see it again). Coloured the images with markers and Waterclor Wonder Crayons/Aqua Painter.


I covered the top cupcake with the pink Chunky Glitter and my Crystal Effects.


For June, I used another strip of DSP from the SAB catty at the top. At the bottom, I used one of the stamps from A Tree For All Seasons.


I coloured the tree in with markers (I think?), and then I created the clouds. I cut a scallop circle out of a piece of scrap, and then I used it as a stencil. I would place it in various spots around the tree, then sponge blue ink around it to create clouds.


For July, I used the Hostess Level 2 set called Echoes of Kindness - this set has some really lovely flowers in it.
I stamped them several different times, and coloured them with crayons/Aqua Painter again.


For August, I used the set Crazy for Cupcakes again. This time, I used the balloon, and coloured 4 of them with my crayons/Aqua Painter.


For September, I used the set called Eastern Blooms. I used my Close to Cocoa, and Really Rust markers to stamp this one, and the same colour ink pads to stamp the smaller flowers around the outside.

At the bottom, I used a silver brad and the Flower Fusion Too Accents and Elements to embellish.


For October, I stamped the grass from Inspired By Nature in Kiwi Kiss ink. And since it is the month that holds the Canadian Thanksgiving, I decided to make a pumpkin using Tangerine Tango CS, and my Large and Small Oval Punches. I used the Slot Punch for the stem.


For November, I used the always popular Lovely As A Tree to showcase a lovely Fall theme.

This one was very simple. : )


For December, I went with the set Holiday Lineup (my favourite Christmas/Holiday set EVER). I coloured these guys in with markers.


Ta Da! I hope you liked it...sorry about the image quality. Thanks for stopping by!
Sunday, March 8, 2009

Robin's Web Finds, Week of March 8, 2009

Here we are again,

I've got some GREAT ones this week! Take a look:

1. Patty Bennett (Patty's Stamping Spot): Manhattan Flower Wedding Card

2. Kelly Lunceford (Flutter by Atomic Butterfly): Rockabilly Pirates Card and Bird on a Branch Card

3. Chat (Me, My Stamps, and I): Three Little Words Card and You, You, You Card

4. Beate (fresh & fun): Pumpkin Poppies Card and WSC71 Card

5. Dawn (Dawns Stamping Thoughts): Fifth Avenue Floral Card

6. Faith (Stampin' With Markie's Mom): Fairy Cards (all 3)

7. Amy Ward (Amy's Addiction): Beautiful Butterflies Card and Cheap Talk Card

8. Amy Rohl (Ink About Me): His and Hers Sweet Ones Cards (old SAB)

9. Kim Teasdale (Paper in the Works): Caught a Bug Card and Daffodils Card

10. Julee Tilman (Poetic Artistry): Miracles Blossom Card and Beautiful Kindness Card

11. Danielle Lounds (Fat Cat Stamper): Hello There Card

12. Connie (Constantly Stamping): Delicate Dots Card

Hope you enjoyed and thanks for stopping by!

Saturday, March 7, 2009

Verve Release Challenge

Hi All,

I noticed that Verve Stamps is releasing some new sets. In honour of that release they have posted a sketch challenge on the Verve blog. All you have to do, is make a card with the sketch, and post the link to your card in their Mr. Linky, and you will be entered to win some new stamps!

Here is mine:


The basis for my colour combo was the Hawaii Papaya DSP (retired from SU), which was one of my favs in the last catty.

The card base is Tangerine Tango, and I layered everything with Chocolate Chip.

I used 2 of the Verve stamp sets that I own: Beautiful You and Asian Flair.

On the large square panel I also used Kiwi Kiss sponging on the white CS, and Tangerine Tango sponging on the flower.

I covered the large flower with Crystal Effects, but you cannot see the reflection in this pic.

It is very rainy today, so hopes of a nice picture are dashed.


Stop by the Verve blog and check things out! (link is above)


Thanks for stopping by!

Monday, March 2, 2009

Robin's Web Finds, Week of March 1, 2009

Here are this week's great sample picks!

1. Connie (Constantly Stamping): SAB Parisian Card.

2. Beate (fresh & fun): Blooming Genie Bag and Branch Out Card Masculine

3. Faith (Stampin' With Markie's Mom): Crimped Card with Tutorial

4. Charmaine (Oodabug Alley): Weekend Sketch #70 Card

5. Julee (Poetic Artistry): Viva la Buttons Card

6. Dawn (Dawns Stamping Thoughts): Colouring Brads & Distressing Card

7. Condy (the creative closet): Easter Lily Card

8. Jody (Confessions of a Ribbon Addict): Great ideas for wheels

9. Danielle (Fat Cat Stamper): Joy Fold Card

10. Nancy (iStamp): Easter Card and Little Bundle of Joy Card

11. Kirsty (kirstys cards 'n' scrapping): Cupcake Card

12. Jen (Kiyomi Krafts): Fisherman Ian

13. Chat (Me, My Stamps, and I): Hello Friend Card and Pinwheel Card

Well, looks like that's it for this week. Hope some of these inspired you - these are all very crafty people!

Thanks for stopping by!