Iris Twist Tutorial
I have made my own tutorial for the Iris Twist technique. This one has been around, but for those of you who haven't had the chance to do it, or don't know how, follow these very easy instructions, and you'll be finished in no time!
What you will need:
Iris Template
Two strips of designer paper 12" x 1"
One piece of cardstock that coordinates with your papers 4" x 5 1/4"
One card base that also coordinates 5 1/2" x 8" folded in half
One small square of neutral cardstock, where you will stamp your small image
Glue Stick
Snail Adhesive
Take your piece of cardstock (4" x 5 1/4") and cut out a 2" square. If you have a 2" square punch, that will be fine, otherwise, I have used a hobby blade with a mat underneath.
Next, take your 2 strips of designer paper, and fold them in half long ways. Unfold them, and run your gluestick all the way down the inside of the fold. Fold them back together and apply some pressure to ensure the glue holds. You may want to let these dry for a minute.
Now, apply some repositionable adhesive to a spot on your Iris template, without going inside the box.
Adhere the template to the FRONT of your cardstock, so you can see the box through your square cut out when you flip it over to look at the back.
Apply some gluestick on your cardstock around the template. DO NOT GET GLUE ON YOUR IRIS TEMPLATE! Keep it on the cardstock only.
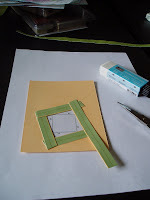
Take your first strip of designer paper. With the fold towards the centre, adhere the paper so that it lines up with the line that says 1A. Ensure it is stuck to the cardstock, and trim the excess paper off. You will continue to use the rest of this strip around the other lines.
Put some more glue on top of the end of the last designer paper piece (you will stick the next one on top). Glue the next strip on the 2A line (only gluing on to the cardstock, not the Iris template). Trim off excess.
Add some more glue onto the end of the previous piece, and adhere the next strip to the 3A line. Trim off excess.
Apply more glue, and adhere the last layer of designer paper on the 4A line. Trim off excess. Let this dry for a minute.
Add glue to the previous designer paper, once again, being sure to keep glue off of the template.
Take the second strip of designer paper and adhere to the cardstock, lining up with the 5B, 6B, 7B, and 8B lines on the template. Let this dry for a minute.

Remove the template carefully. Turn the card front over and take a look. Take your small, neutral cardstock, stamp your image, and adhere to the back of the card front, ensuring that the image shows through the small square at the front.
Stamp the card front if you would like more design. Otherwise, adhere your card front to your card base. You're finished!


No comments:
Post a Comment