Friday, May 28, 2010

InStyle Stamps Blog Hop: Father's Day

Hi All,

Thanks for joining me today! We are hopping along with InStyle Stamps, and this month's theme is Father's Day!  If you have come here from Kerry's blog, you are right on track!  If not, please head back to the ISS blog for the full blog hop order.  You can also win some delicious prizes, so head over there to find out how! It's always commenting and voting!

Here is my card:

My card base is Blue Bayou , and I added a piece of Taste of Textiles specialty DSP, which was punched with an SU edge punch.  I added some self-adhesive nail heads onto that border.  Next, I used my Top Note die from SU, and cut one out of Basic Black CS, and one out of Whisper White CS, and I trimmed the white one.  I also embossed the white piece with the houndstooth Cuttlebug folder, but it ended up being mostly covered.

For the main image, I printed Father and Kid onto PTI White CS and coloured it with Copics.  I matted that with a piece of Basic Black, and stuck that layer to the Top Note layer.

Your next stop is Lana - head on over to see her amazing work!

Hope you enjoyed, and thanks for stopping by!

Wednesday, May 26, 2010

Card Patterns 65: Some Odd Girl Dino

Hi All,

I decided to play along with the current sketch over on the Card Patterns blog: CP 65.  It was nice, and simple, and I really enjoyed it!  Here is the glimpse:

Here is my take on it:

I started off with a Kraft base.  I added 4 round buttons (tied with Linen Thread) to the corners with Mini Glue Dots (I think they are Rose Red colour).  The square at the back is a plain Whisper White piece, then there is a blue strip from the Bali Breeze DSP pack, which I distressed.  On top of that, there is a green piece of Bali Breeze DSP, which was also distressed.  I took a piece of Old Olive CS, and cut it with my Martha Stewart grass punch, and stuck it on top of the green square. The sentiment is from SU's Vintage Labels set - stamped in black ink onto a white scrap, and punched out with my Word Window punch, and adhered just below the white square. I attached another button to the right side of that.

I printed the Dino image from Some Odd Girl onto PTI White CS, coloured him with Copics, cut him out, and mounted him onto the grass.

I thought this would be a cute card to give to a kid - they love animals and bright, fun colours!

Hope you enjoyed, and thanks for stopping by!

Tuesday, May 25, 2010

InStyle Stamps Bookmark

Hi all,

There are some really cute Chloe images at InStyle Stamps right now!  I decided to use Chloe Reading to make a bookmark - very fitting for that image!

I cut the base out of Rose Red CS using my scallop Long Rectangle Nesties.  The next layer is Raspberry Tart DSP. 

For the main panel, I printed Chloe onto PTI White CS, coloured her with Copics, and cut her out with Long Rectangle Nesties.  I added some sponged clouds using Bashful Blue ink.  I mounted that onto a Basic Black CS piece, then onto a scalloped Whisper White piece.  To the right of that, I added 3 Rose Red brads using my Mat Pack and Paper Piercer to line them up.  To the left, I added an Antique Brass clip (from Hodgepodge Hardware), with some pink gingham ribbon tied to it.

Easy Peasy!  I hope you enjoyed, and thanks for stopping by!

Sunday, May 23, 2010

50th Anniversary Card, SU Style

Hi All,

My mom asked me to whip up an anniversary card for a 50th anniversary party she was attending.  I immediately thought of my Bride and Groom Specialty papers from Stampin' Up! 

My card base is Whisper White, then a layer of Basic Gray.  I added a layer of Groom Specialty DSP (the black, swirly one), with the bottom edge punched with a Martha Stewart edge punch, and a strip of white underneath.  Across that, I added some White Satin ribbon, with some self-adhesive ribbon across that.  I also added 3 silver brads to the left side of the panel.

I decorated the inside with the Groom DSP, Whisper White, and some more self-adhesive ribbon to match.

For the main panel, I took some Bride Specialty DSP (the swirly white one) and stamped the flowers from Upsy Daisy in Basic Gray ink.  Then, I stamped the sentiment from Whimsical Words in Versamark and embossed with silver EP.  I outlined the words with a white gel pen because the paper was so busy, I needed them to stand out a bit more.

Hope you enjoyed, and thanks for stopping by!

Saturday, May 22, 2010

InStyle Stamps: Colour Challenge

Hi All,

It's time again for another colour challenge over at the InStyle Stamps blog!  We had some lovely inspiration this time around, with a picture that Taylor chose for us from the decor8 Blog!  Here is the colour inspiration:

Now, I didn't go with that much white, but I did pull the blues, greens, and orange from the pic onto my card.  I chose the adorable Daydream Girl image - I am loving these A Day In The Life images!

Here goes:

My card base is Whisper White, followed by a piece of Tangerine Tango Patterns DSP, punched with an EK Success edge punch.  Along the bottom, I added a strip of Bermuda Bay CS, matted with a strip of Whisper White.  I then tied a bow around the base layer with some White Organdy ribbon. 

For the main image, I printed Daydream Girl onto PTI White CS, coloured it with Copics, and cut it out with Label Nesties.  I matted that onto a larger layer of Whisper White, cut with the Nesties.

Head on over to the ISS blog to check out what the whole DT have done, and submit your own creation with that divine inspiration!

Hope you enjoyed, and thanks for stopping by!

Friday, May 21, 2010

A Day in the Life: BFF Lunch

Hi All,

I was playing with my new images from InStyle Stamps, and I HAD to use one of the images from their "A Day in the Life" series!  These are sooooo much fun to colour, and you can make such an eye-catching image!  I chose to work with BFF Lunch this time, but you will be seeing others!

Here goes:

My card base is Basic Gray, followed by Whisper White and Basic Black layers.  Then, there is a Marigold Morning layer, which was embossd with the Cuttlebug Forest Branches folder.  All of the layers were punched with the Ticket Corner punch.  I added a row of silver brads at the bottom of that, using my mat pack and paper piercer.

For the main image, I printed it onto PTI White CS and coloured it with Copics, then I matted that layer with a Basic Black layer.  Underneath all the corners, I added black and white photo corners to make a kind of "frame" for the image.  The white photo corners were also embossed with the same CB folder.

These images are tons of fun, and I definitely recommend heading over to the store to choose one or two that strike your fancy!
Hope you enjoyed, and thanks for stopping by!

Added:
***Check out THIS post from my fellow DT member Angela - I used some of the same colours as her and our images look kind of similar! Thanks for the inspiration Angela - I must have had your card in the back of my mind when I created this!

Thursday, May 20, 2010

SOG Stash Challenge #3: 3 Patterned Papers

Hi All,

We have another great challenge going on at the Some Odd Girl Challenge blog!  This week, you are supposed to use at least 3 different patterned papers, from 3 different companies!  Now, that is a challenge! Especially not being able to use a bunch of different papers from the same paper pack!
Head on over to the SOG blog to submit your own creation.

Here we go:

My card base is Whisper White, followed by a piece of patterned paper from SEI's Poppy collection, matted with a Basic Black CS. It is a nice blue paper, with shiny silver designs cut into it.  For the smaller panel, it is a piece of patterned paper from Heidi Grace called Moonlight Meadow, matted with a piece of Basic Black, and a piece of Whisper White.  The DSP is a shimmery blue colour with white fuzzy designs on it - yummy!  I added some paper piercing around the edges of that.

For the horizontal panel, it is a piece of patterned paper from SU's Bride Specialty pack - I stamped that with a sentiment from SU's Whimsical Words in Versamark, and embossed with White EP.  It says "Follow Your Heart - It Knows The Way".  The strip was matted with Basic Black and then Whisper White CS.

I printed Heart Kaylee from SOG onto PTI White CS, coloured her with Copics, cut her out, and mounted her on with Dimensionals.  Kaylee is tooo cute!  Check out the SOG blog to see what the whole DT have done!

Hope you enjoyed, and thanks for stopping by!

Sunday, May 16, 2010

MTSC73: Kitty With Yarn

Hi All,

I am participating in Mercy's Tuesday Sketch Challenge #73 from this week.  She always makes such a great sketch, I sometimes feel the need to add a creation!  I have also used an adorable image from Some Odd Girl - it's the kitty with the ball of yarn...soooo cute!

Here is the sketch - it's a loooooong one:

***Added:
OK, so my internet went down mid-post last night and I only got to post the sketch!  So, on with the actual card...

My card base is Basic Gray, followed by a piece of Regal Rose Prints DSP, with Jumbo Eyelets at each corner.  I cut a Basic Black strip out, and cut a "V" on the right end, and adhered it to the base.  For the next panel, I used Basic Gray Prints DSP, Basic Black CS, and Regal Rose.  For the circle, I used my Nesties with Basic Gray Prints DSP and Basic Black CS.

I printed the kitty onto PTI White CS, coloured him with Copics, and cut him out. I also added a gray patch over one eye with a dark Copic marker.

This was a really simple, fun card to make!
Hope you enjoyed, and thanks for stopping by!

Wednesday, May 12, 2010

Over the Hump Day Blog Candy Giveaway: Father's Day

Hi All,

Welcome to another Hump Day Blog Candy Giveaway by InStyle Stamps!  Our theme for this month is Father's Day, and everyone is making a card or project for a father or father-figure.  I find that most people have trouble making cards for the man or boy in their life, so this is everyone's chance to crank out those male cards!  This month's prize: any 4 digital images from April's or May's releases!!! That is an awesome prize.

I decided to use "Richard" who is going to make an appearance at an upcoming release by ISS.

My card base is Ballet Blue.  That was followed by Basic Black, and Basic Gray, topped off with Brilliant Blue, which was embossed with my Argyle Cuttlebug folder.  I wrapped a piece of Soft Suede polka dot ribbon around that base layer.
Then, I chopped a rectangle of Whisper White, and Basic Black.  On the white piece, I sponged some Bashful Blue, Ballet Blue, and Brilliant Blue inks to make a gradiated colour.  Then, I embossed the white piece with the Argyle embossing folder. 
I cut a faux prize ribbon out of Marigold Morning CS, using a couple of strips and my 1 3/4" Circle Punch.  I stamped the father sentiment in Versamark on that, and embossed with black EP.  I added some self-adhesive nail heads along the tails of the ribbon too.

I printed Richard onto PTI White CS, coloured him with Copics, cut him out, and mounted him on the rectangle panel with Dimensionals.

Hop over to the ISS blog to see what the whole DT have done and to submit YOUR Father's Day creation to win 4 digis. 
Hope you enjoyed, and thanks for stopping by!

Monday, May 10, 2010

Craft Critique: Mother's Day Carnival

Hi All!

I just got back from a short trip to Jamaica to visit some family.  I hope everyone had a lovely Mother's Day.  I thought I would let you know that Craft Critique had a Mother's Day Carnival to showcase lots of Mother's Day projects and cards.

Check out the link HERE.

You will also find me mentioned in there somewhere! I am about the 20th person down.  There are a lot of great project ideas, so go and check them out!

Friday, May 7, 2010

Instyle Stamps, Sketch Challenge 9

Hi All,

It's that time of the month for another sketch challenge from InStyle Stamps!  I LOVE sketch challenges.  It seems like there are endless possibilities - you can choose your colours, papers, embellishments...everything!

Please also make sure you stop by the ISS blog to see what the whole DT have been up to!

Here is the sketch:

Lots of room for creativity!
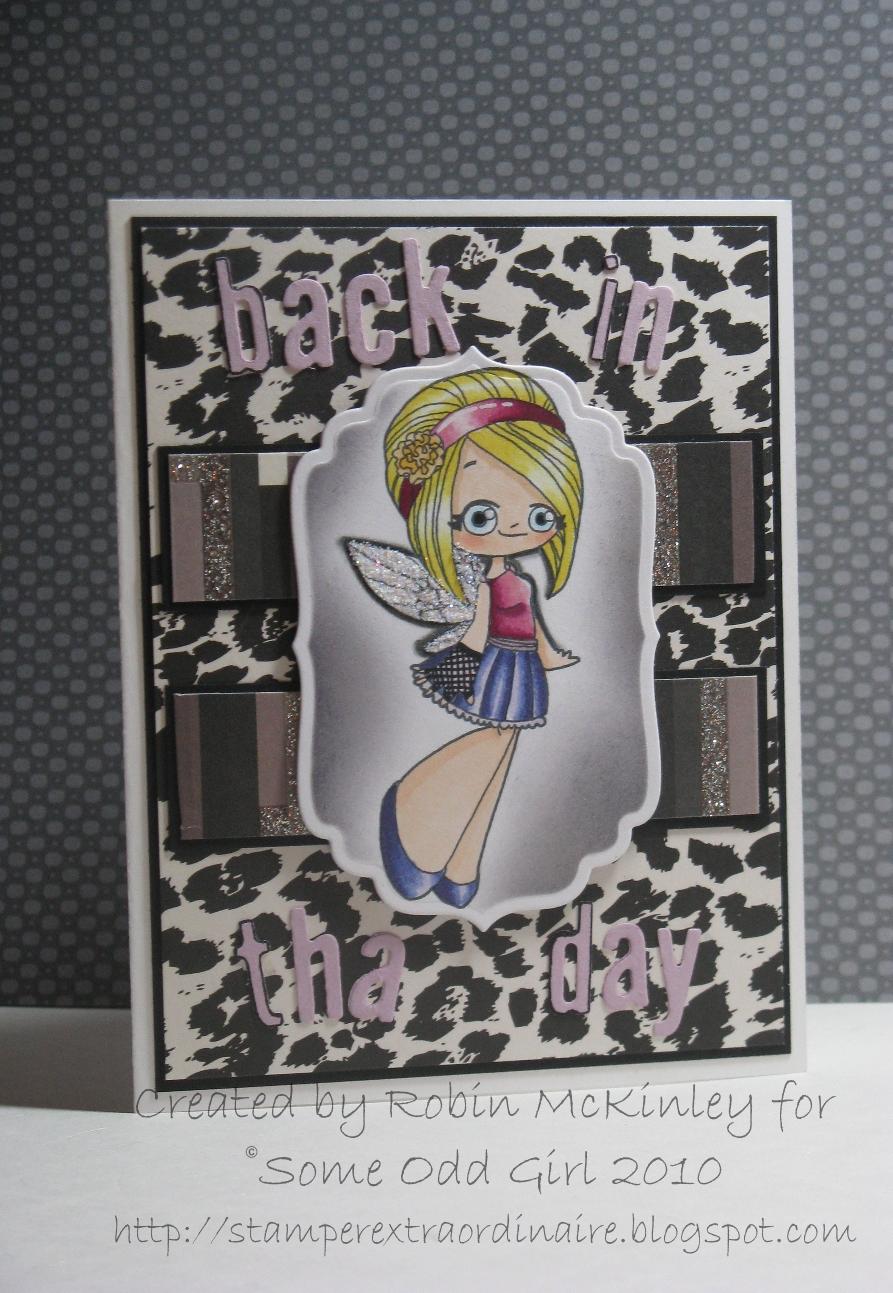
Here's what I got:

My card base is Old Olive Textured CS.  For all of the cardstock and patterned papers, I got them from a Simply Scrappin' Kit (SU) called Confetti.  For the next layer, I used some DSP, matted with Basic Black CS, which was punched with an EK Success edge punch.  I added 2 photo corners using Black CS and DSP.  For the vertical layer, I used DSP and Basic Black CS again. 
But, on op of that, I added a rub on - some vines and flowers.  I also added some cosmo glitter with my 2-Way Glue Pen.  I tied some White Satin ribbon around the whole base layer.

I stamped the sentiment "Grateful" (from Close To My Heart) in Versamark ink onto Summer Sun CS, and embossed with Maize embossing powder.  That was punched out with the Word Window punch, and adhered to the bottom of the long panel.

For the main panel, I printed "Wishing Chloe" onto PTI White CS, coloured her with Copics, and cut her out with Oval Nesties.  I added some sponging for the clouds with Bashful Blue ink to the background.  I matted that with a Basic Black layer.

I hope you're all able to participate in the sketch challenge.  And head over to the ISS Store to pick up some new images!

Hope you enjoyed, and thanks for stopping by!

Thursday, May 6, 2010

Second Style Challenge from Some Odd Girl: 80's Style!

Hi All,

It is time for another Style Challenge over at the Some Odd Girl Challenge Blog!  This month's style challenge is to be inspired by the 1980's.  Now, I REALLLLLLY had to think about this one.  I chose to combine some funky patterns with some bright colours, and I even gave my image a little Madonna inspiration!  I chose the adorable Fairy Mae to represent my 80's card.  Get on over to the blog to see what the whole talented DT have come up with and to enter your own creation!

My card base is Whisper White.  For the next layer, I took a piece of the leopard paper from the All Dressed Up pack by DCWV, and matted it with Basic Black.  I cut out a bunch of letters with my Big Shot and my Billboard Alphabet die using Pale Plum CS - I spelled out "Back in tha day".
I added 2 strips across the background panel using another pattern from the DSP pack and Basic Black CS.

Mae was printed onto PTI White CS and coloured with Copics.  I cut her out with Label Four Nesties, and added some Basic Gray ink around her.  Her wings were covered in glitter as well.

Please take a closer look at Mae's right hand - I gave her one of those cool fishnet gloves, inspired by Madonna...so 80's!  I think Mae looks like she might be going to one of her concerts!

Also, there is a new Freebie up to download this month.  Please head over to get your free download of Cherry Sprinkles! That cute guy will be there until the end of the month.

Hope you enjoyed, and thanks for stopping by!